[26ai] DBMS_CLOUD — Chapter Two
![[26ai] DBMS_CLOUD — Chapter Two](/_next/image?url=https%3A%2F%2Fcdn.hashnode.com%2Fuploads%2Fcovers%2F65605419d28f19cc44df7ef1%2Fdafc38ec-0438-45d3-8f94-bb7640ba58a4.jpg&w=3840&q=75)
Ingeniero informático, Oracle ACE, DBA y Arquitecto OCI, con más de 15 años de experiencia en plataformas Oracle. Certificado en OCI Certified Architect Professional y OCI Migration and Integration Certified Professional.
If you prefer to read in Spanish Spanish version.
Cointinuing with the last article, where we looked at how to set up DBMS_CLOUD in our database and took the firsts steps., today, we're going to see how to use DBMS_CLOUD with Oracle Datapump.
Below, you can see the first chapter:
[26ai] DBMS_CLOUD — Capitulo Uno
Our lab will have two sections, as follows:
Export a table to a Bucket.
Import into the table the information from the previous step.
Export to a Bucket
Let's create a table. We'll use this table in order to perform the export :
SQL>
  Create Table My_Grants As
   Select TABLE_SCHEMA,TABLE_NAME,PRIVILEGE
     From All_Tab_Privs;

 Table created.

SQL> set linesize 1000 pages 1000
SQL> col TABLE_SCHEMA format a20
SQL> col table_name format a20
SQL> col privilege format a20
SQL> r
  1* Select * From My_Grants FETCH FIRST 10  ROWS ONLY

TABLE_SCHEMA         TABLE_NAME                     PRIVILEGE
-------------------- ------------------------------ --------------------
SYS                  DUAL                           SELECT
SYS                  SYSTEM_PRIVILEGE_MAP           READ
SYS                  TABLE_PRIVILEGE_MAP            READ
SYS                  USER_PRIVILEGE_MAP             READ
SYS                  STMT_AUDIT_OPTION_MAP          READ
SYS                  FINALHIST$                     INSERT
SYS                  DM$EXPIMP_ID_SEQ               SELECT
SYS                  MODELGTTRAW$                   SELECT
SYS                  MODELGTTRAW$                   INSERT
SYS                  PMAPGTT$                       SELECT
Moreover, we're going to use the DEFAULT_CREDENTIAL property in order to set our credential as the default.
SQL>
ALTER DATABASE PROPERTY SET DEFAULT_CREDENTIAL = 'TEST.DBA_IN_THE_SHADOW';

Database altered.

SQL>
Select PROPERTY_NAME,PROPERTY_VALUE
  From database_properties
 Where PROPERTY_NAME= 'DEFAULT_CREDENTIAL';

PROPERTY_NAME        PROPERTY_VALUE
-------------------- ----------------------------------------
DEFAULT_CREDENTIAL   TEST.DBA_IN_THE_SHADOW
Let's create a parfile in order to perform the export:
SQL> ! vi export_to_bucket.par
SQL> ! cat export_to_bucket.par
DUMPFILE=<location_uri>/<TABLE>.dmp
LOGFILE=<TABLE>.log
TABLES=<SCHEMA>.<TABLE>
CONTENT=DATA_ONLY
LOGTIME=ALL
METRICS=YES
FLASHBACK_TIME=SYSTIMESTAMP
ENCRYPTION_PASSWORD=hari
Our parfile is as follows:
DUMPILE: Bucket URL in order to save the export.
LOGFILE: Log name.
TABLES: Here, we fill in the parameter with the name of the table that we created in the previous step.
CONTENT=DATA_ONLY: Export Data only.
LOGTIME/METRICS: Time Metrics .
FLASHBACK_TIME: Consistent data export.
ENCRYPTION_PASSWORD: Encrypt our dmp file.
Let's execute the export:
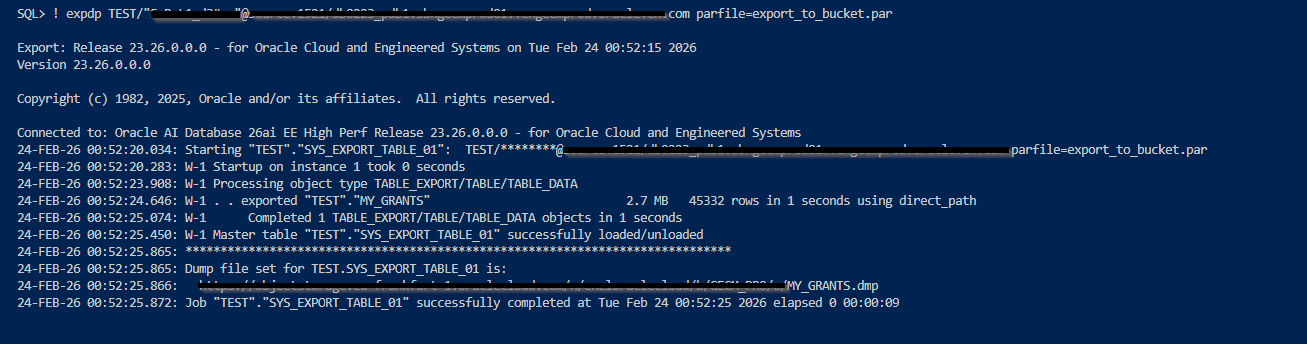
Let's check our dmp in ourBucket:
SQL>
Select object_name, trunc(bytes / (1024*1024),2) MB
  From
   dbms_cloud.list_objects('DBA_IN_THE_SHADOW', '<location_uri>');

OBJECT_NAME                                      MB
---------------------------------------- ----------
ORA7445pf_20260205085710_COM_1.zip            57.35
Wallet_OF2BAP.zip                               .02
Wallet_OF2BCE.zip                               .02
grant.dmp                                         0
grant.dmp_segments/aaaaaa                         2
grant.dmp_segments/aaaaab                       .86

6 rows selected.
Regarding our dmp inside out Bucket, we can see three files even though we haven't used any wildcards, such as %L, %l, %U, or %u. Moreover, the size of our dmp is zero, while the DMP fragments have weigth. How come? Because Data Pump splits the dmp into smaller pieces in order to improve load performance.
ImportIng from a Bucket
Before executing the import , we need to create a table in order to store the data:
SQL> CREATE TABLE MY_GRANTS_BCK AS SELECT * FROM MY_GRANTS WHERE 2 = 1;

Table created.
SQL> ! vi import_to_bucket.par
SQL> ! cat import_to_bucket.par
DUMPFILE=<location_uri>/<TABLE>.dmp
LOGFILE=MY_GRANTS.log
LOGTIME=ALL
METRICS=YES
REMAP_TABLE = TEST.MY_GRANTS:MY_GRANTS_BCK
encryption_password=yes
Our parfile is as follows:
DUMPILE: Bucket URL in order to get the export.
LOGFILE: Log name.
LOGTIME/METRICS: Time Metrics.
REMAP_TABLE: We want to store the information in another table, so we need to use the REMAP_TABLE parameter.
ENCRYPTION_PASSWORD= Our dmp is encrypted.
Let's execute the import:

Perfect, we have been able to use our Bucket with Oracle Data Pump.
Looking forward to seeing you in the next article :)
![[OCI] Clone PDB](/_next/image?url=https%3A%2F%2Fcdn.hashnode.com%2Fuploads%2Fcovers%2F65605419d28f19cc44df7ef1%2F4c20418f-c149-484c-a2b7-c30b4cfec47b.png&w=3840&q=75)
![[OCI] Check Jobs DBCli](/_next/image?url=https%3A%2F%2Fcdn.hashnode.com%2Fuploads%2Fcovers%2F65605419d28f19cc44df7ef1%2F4007e787-d6ad-47d9-b238-d69a285383ab.png&w=3840&q=75)
![[26ai] JOIN_TO_ME](/_next/image?url=https%3A%2F%2Fcdn.hashnode.com%2Fuploads%2Fcovers%2F65605419d28f19cc44df7ef1%2F49867547-f920-47a6-b11f-f5db511bcc73.png&w=3840&q=75)
![[26ai] Cleanup of Obsolete PL/SQL Objects](/_next/image?url=https%3A%2F%2Fcdn.hashnode.com%2Fuploads%2Fcovers%2F65605419d28f19cc44df7ef1%2F64ada612-0048-411c-b9df-61b8825af6e7.png&w=3840&q=75)
![[26ai] Hybrid Read-Only Mode PDB](/_next/image?url=https%3A%2F%2Fcdn.hashnode.com%2Fuploads%2Fcovers%2F65605419d28f19cc44df7ef1%2F23e8f92e-f89b-4746-930e-98156e3a1ec4.png&w=3840&q=75)